Proudly featured in


How to Create a Legal Document Scanning System Using a ScanSnap: Part 1 of 2
If you’re like most law firms these days, you’re probably either a) contemplating running a paperless office b) transitioning to a paperless office or c) enjoying the awesomeness of the paperless office.
If you’re not a user and devotee already, invest in one of the Fujitsu ScanSnap series of document scanners. I can vouch for ’em myself.

A Fujitsu ScanSnap is like Paris: when people talk about it, you can’t imagine it living up to the hype. But when it’s your turn to take a look, all expectations are completely surpassed.
Here’s a tip for those using a ScanSnap: stop using the Quick Menu. That’s for noobs (techie for newbies). Use Profiles instead.
In ScanSnap land, a Profile is just a named group of settings. Nothing to be frightened of. Profiles allow you to scan a document and have it saved and named automatically in a location of your choosing.
This facilitates an efficient workflow which will allow you to scan and file a big stack of documents in no time at all. We’ll look at Profiles in Part 1 and the workflow in Part 2.
The following instructions are for the Mac: (any Windows user who would like to add their own instructions in comments or as a guest post lemme know).
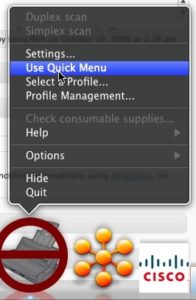
1) Turn off Quick Menu by right-clicking the ScanSnap icon in the Dock, and unchecking “Use Quick Menu”.
2) Launch the ScanSnap Settings window by right-clicking the ScanSnap icon in the Dock, and selecting “Settings…”.
3) Add a new profile by clicking on the “Select a Profile” drop down, and choose “Add Profile…” Choose a good name, like “Legal Docs”. You can create different profiles for different needs.
4) You’ll see a bunch of tabs, from Application on the left to Compression on the right. For the purposes of scanning typical office documents, here’s my suggestions.
5) Under the Application tab, select Preview. The reason for this choice is that Preview loads quickly and is a lightweight app, unlike Adobe Reader.

6) Under the Save tab, choose a folder to dump the new file to. I like to put them into a folder called “Awaiting Filing” on the desktop. Think of this folder as a “staging area”. Once you scan your docs in, you will process them (in Part 2 of this series).

7) Next, click on the Scanning tab. For “Image quality”, select “Best (Slow)”. For “Color mode”, select “Auto Color Detection”. For Scanning side, select “Duplex Scan(Double Sided)”.

Once you get comfortable creating and working with Profiles, you can create different ones for different purposes, i.e. scanning in color photographs or your kid’s artwork.
Share post: